Category

Recipes

Fresh Peach Cake

By | Recipes | No Comments

Savour the essence of summer with our Fresh Peach Cake. This moist and tender delight features layers of soft cake enveloping juicy peach slices, topped with a buttery cinnamon streusel. Perfectly balanced sweetness makes each bite a celebration of the season. Enjoy it as a decadent dessert or a delightful breakfast treat. Share the joy of summer with every slice.

Prep Time: 10 minutes Cook Time: 45 minutes Servings: 12-16 slices

Ingredients:

  • 2 cups all-purpose flour
  • 1 teaspoon baking powder
  • 1/2 teaspoon baking soda
  • 1/2 teaspoon salt
  • 1/2 cup unsalted butter, softened
  • 1 cup granulated sugar
  • 2 large eggs
  • 1 teaspoon vanilla extract
  • 1 cup sour cream
  • 3-4 fresh peaches, peeled, pitted, and sliced

For the Streusel Topping:

  • 1/2 cup brown sugar, packed
  • 1/4 cup all-purpose flour
  • 1/4 cup unsalted butter, cold and cubed
  • 1 teaspoon ground cinnamon

Method

  1. Preheat your oven to 350°F (175°C). Grease and flour a 9×13-inch baking pan.
  2. In a medium bowl, whisk together the flour, baking powder, baking soda, and salt. Set aside.
  3. In a large mixing bowl, cream together the softened butter and granulated sugar until light and fluffy.
  4. Add the eggs one at a time, beating well after each addition. Stir in the vanilla extract.
  5. Gradually add the dry ingredients to the wet ingredients, alternating with the sour cream. Begin and end with the dry ingredients. Mix until just combined.
  6. Spread half of the batter into the prepared baking pan.
  7. Arrange the sliced peaches over the batter in the pan.
  8. In a small bowl, mix together the streusel topping ingredients (brown sugar, flour, butter, and cinnamon) until crumbly. Sprinkle half of the streusel over the peaches.
  9. Carefully spread the remaining batter over the peaches and top with the remaining streusel.
  10. Bake in the preheated oven for 45-50 minutes or until a toothpick inserted into the center comes out clean.
  11. Allow the cake to cool in the pan for about 15 minutes before transferring it to a wire rack to cool completely.
  12. Slice and serve. Enjoy your delicious Fresh Peach Cake!

3-ingredient Salted Caramel Cookie

By | Recipes | No Comments

Whip up magic in just 30 minutes with our 3-Ingredient Salted Caramel Cookie! These bite-sized wonders feature the unbeatable combo of salted caramel and chocolate chip cookies. They’re quick, easy, and irresistibly delicious – perfect for a last-minute dessert fix or any sweet craving.

Prep Time: 15 minutes Cook Time: 15 minutes Servings: 12

Ingredients:

  • 1 package (468g) refrigerated chocolate chip cookie dough
  • 1/2 cup (120ml) salted caramel sauce
  • 1/4 teaspoon sea salt (for garnish, optional)

Method

Step 1: Preheat the Oven

  1. Preheat your oven to the temperature specified on the cookie dough package (usually around 175°C).

Step 2: Prepare the Muffin Tin

  1. Grease a 12-cup muffin tin with cooking spray or line it with cupcake liners.

Step 3: Create Cookie Cups

  1. Take the refrigerated chocolate chip cookie dough and divide it into 12 equal portions.
  2. Roll each portion into a ball and press it into the bottom and up the sides of each muffin cup, forming a well or cup shape.

Step 4: Bake

  1. Place the muffin tin in the preheated oven and bake the cookie cups according to the package instructions. This usually takes about 10-15 minutes, or until the cookie cups are lightly golden.

Step 5: Add Caramel

  1. Remove the cookie cups from the oven and let them cool in the muffin tin for a few minutes.
  2. Carefully remove the cookie cups from the muffin tin and allow them to cool completely on a wire rack.

Step 6: Fill with Salted Caramel

  1. Once the cookie cups are completely cool, fill each cup with salted caramel sauce. You can microwave the caramel sauce for a few seconds to make it easier to pour.

Step 7: Garnish

  1. If desired, sprinkle a small pinch of sea salt on top of each caramel-filled cookie cup for that classic salted caramel flavour.

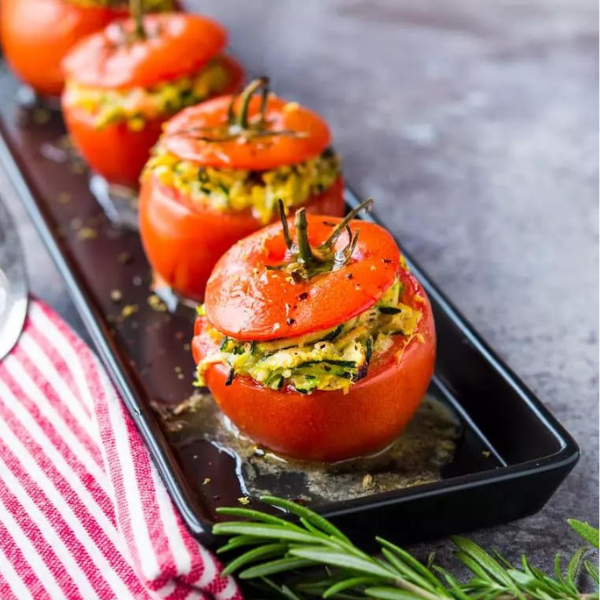
Zucchini-Stuffed Tomatoes with Rosemary

By | Recipes | No Comments

These zucchini-stuffed tomatoes with rosemary offer a flavorful and aromatic twist on a classic dish, perfect for any meal occasion!

Prep Time: 15 minutes Cook Time: 25 minutes Total Time: 40 minutes Servings: 4

Ingredients:

  • 4 large ripe tomatoes
  • 1 cup grated zucchini
  • 1/4 cup crumbled feta cheese
  • 1/4 cup fresh rosemary, finely chopped
  • 2 cloves garlic, minced
  • Salt and black pepper to taste
  • 2 tablespoons olive oil
  • 2 tablespoons breadcrumbs
  • Fresh rosemary sprigs for garnish
  • Extra feta cheese for serving

Method

  1. Preheat the Oven: Preheat your oven to 375°F (190°C).
  2. Prepare the Tomatoes: Cut the tops off the tomatoes and carefully scoop out the pulp and seeds, leaving the tomato shells intact. Be gentle not to tear the tomatoes. You can use a small spoon or a melon baller for this.
  3. Prepare the Filling: In a mixing bowl, combine the grated zucchini, crumbled feta cheese, finely chopped fresh rosemary, minced garlic, salt, and black pepper. Mix everything together until it’s well combined.
  4. Stuff the Tomatoes: Fill each hollowed-out tomato with the zucchini mixture, ensuring it’s packed in well. Place the stuffed tomatoes in a baking dish.
  5. Top with Breadcrumbs: Drizzle a little olive oil over the top of each stuffed tomato and sprinkle breadcrumbs evenly over them. This will give the dish a nice crispy top.
  6. Bake: Place the baking dish in the preheated oven and bake for about 20-25 minutes or until the tomatoes are tender, and the tops are golden brown.
  7. Garnish and Serve: Once the tomatoes are cooked, remove them from the oven. Garnish with fresh rosemary sprigs and an extra sprinkle of feta cheese if desired.
  8. Serve: Enjoy your zucchini-stuffed tomatoes with rosemary as a delicious appetizer, side dish, or a light main course. They are best enjoyed while still warm.

Spicy Coconut Grilled Chicken Thighs

By | Recipes | No Comments

Welcome to your newest go-to summer marinade, featuring some spicy sambal, brown sugar and coconut milk to balance out the heat, and lots of fresh ginger and lime juice. This one’s just as awesome with shrimp or flank or skirt steak as it is with chicken thighs.

Ingredients:

  • 1 x 7.5 cm piece fresh ginger
  • 5 x garlic cloves
  • 190 ml coconut milk
  • 60 ml hot chili paste (such as sambal oelek)
  • 60 ml fresh lime juice
  • 2 Tbsp. light brown sugar
  • 1 Tbsp Diamond Crystal or 1¾ tsp.
  • Morton kosher salt
  • 2 Tbsp vegetable oil, plus more for grill
  • 900 g skinless, boneless chicken thighs
  • 125 ml cilantro leaves with tender stems
  • Lime wedges (for serving)

Method

  1. Step 1

    Prepare a grill for medium heat. Finely grate ginger and garlic into a medium bowl. Add coconut milk, chili paste, lime juice, brown sugar, salt, and 2 Tbsp. oil and whisk to combine. Add chicken and toss to coat. Let sit at least 15 minutes or up to 4 hours.

    Step 2

    Remove chicken from marinade, letting excess drip back into bowl, and transfer to a rimmed baking sheet. Pour marinade into a small saucepan. Bring to a boil, then reduce heat to medium-low and simmer, stirring occasionally, until slightly reduced and thick enough to coat the back of a spoon, 2–3 minutes.

    Step 3

    Clean and generously oil grate of grill (if there are a few flare-ups while you do so, not to worry, they will burn off). Grill chicken, turning once and basting occasionally with marinade, until you see some good grill marks and chicken is cooked through, 8–10 minutes.

    Step 4

    Transfer chicken to a platter. Brush with remaining marinade. Top with cilantro and serve with lime wedges alongside.

Roast Lamb with Garlic & Rosemary

By | Recipes | No Comments

Rosemary and Garlic Roasted Lamb with Homemade Gravy – A mouthwatering masterpiece of tender lamb, aromatic herbs, and rich, homemade gravy.

Ingredients:

  • 1 large leg of lamb with or without bone (about 2.5kg)
  • 2 bulbs of garlic
  • a few sprigs of rosemary
  • 100ml olive oil
  • 1 tbsp flaky sea salt
  • 3 onions, roughly chopped
  • 5 carrots, sliced in half lengthways
  • 500ml chicken stock – use gluten-free stock if required
  • 2 tsp cornflour

Method

  1. Begin by creating small openings all over the lamb. Take 10 garlic cloves, peel them, and then cut them in half. Insert these garlic pieces into the openings you made in the lamb. Take small sections of rosemary and place them into the remaining openings. Afterward, gently rub the lamb with a bit of olive oil and season it with sea salt.
  2. Position the lamb on a wire rack inside a roasting tray and let it sit at room temperature for approximately 1 hour. This will help the lamb cook evenly.
  3. Preheat your oven to 200°C (or 180°C with a fan, gas mark 6). Put the onions and carrots in the bottom of the roasting tray underneath the lamb on the rack. Add the remaining olive oil, unpeeled garlic cloves, and a few sprigs of rosemary. Place the lamb in the oven and roast for 15 minutes to achieve a nice browning. Afterward, lower the oven temperature to 180°C (or 160°C with a fan, gas mark 4). Continue roasting for approximately 1.5 hours, or adjust the time to your desired level of doneness. You can check for doneness by inserting a roasting fork into the center of the meat and lightly touching the fork to your upper lip or inner wrist. It should feel slightly warmer than your body temperature. For a well-done lamb, roast for around 2.5 hours. Once done, remove the lamb from the oven and allow it to rest for 10-15 minutes.
  4. While the lamb is resting, prepare the gravy. Remove any excess fat from the roasting tray and place it on the stovetop. If the vegetables aren’t yet caramelized, sauté them until they reach the desired color. Add chicken stock, bring it to a simmer, and season to taste. In a separate bowl, mix cornflour with a bit of cold water, then whisk it into the gravy. Include any juices that have accumulated while the lamb was resting. Simmer for a few minutes, pressing the vegetables to extract their flavors. Strain the gravy through a sieve into a separate pan and keep it warm until you’re ready to serve.

Spider Cookies

By | Recipes | No Comments

Here’s a fun and spooky Spider Cookie Recipe for Halloween!

Prep Time: 15  Minutes  |  Cook Time: 15  Minutes  | Serves 4

Ingredients:

For the cookie dough:

  • 2 1/4 cups all-purpose flour
  • 1/2 teaspoon baking soda
  • 1 cup unsalted butter, softened
  • 1/2 cup granulated sugar
  • 1 cup packed light-brown sugar
  • 1 teaspoon salt
  • 2 teaspoons pure vanilla extract
  • 2 large eggs
  • 1/2 cup unsweetened cocoa powder
  • 1 cup semisweet and/or milk chocolate chips

For decorating:

  • 1 cup chocolate chips or melting chocolate
  • 24 chocolate truffle candies (such as Lindt Lindor Truffles)
  • 48 candy eyes
  • Red gel icing (for optional mouth)

Method

  1. Preheat your oven to 175°C Line two baking sheets with parchment paper.
  2. In a medium bowl, whisk together the flour and baking soda. Set this aside.
  3. In a large bowl, cream together the softened butter, granulated sugar, brown sugar, and salt until the mixture is light and fluffy. This should take about 3 minutes.
  4. Add the eggs and vanilla extract to the butter-sugar mixture, and beat until well combined.
  5. Gradually add the cocoa powder and mix until fully incorporated.
  6. Slowly add the dry ingredients (flour and baking soda mixture) to the wet ingredients and mix until a smooth cookie dough forms.
  7. Stir in the chocolate chips.
  8. Scoop out spoonfuls of cookie dough and place them on the prepared baking sheets, leaving some space between each cookie.
  9. Bake for 10-12 minutes, or until the edges are set. The cookies will continue to firm up as they cool.
  10. While the cookies are still warm, carefully press a chocolate truffle candy into the center of each cookie to create the spider body.
  11. For the spider legs, melt the chocolate chips or melting chocolate in the microwave or using a double boiler. Once melted, transfer the chocolate to a piping bag or a resealable plastic bag with a small corner snipped off.
  12. Pipe 8 chocolate legs radiating from each truffle to create the spider’s legs. Let the chocolate cool and harden.
  13. Once the chocolate legs have set, attach candy eyes to the truffle body using a dab of melted chocolate as “glue.”
  14. If desired, use red gel icing to add a spooky mouth to your spiders.
  15. Allow the cookies to cool and the chocolate to set before serving. Enjoy your delicious and spooky Spider Cookies at your Halloween gathering!

These spider cookies are a perfect addition to any Halloween party and are sure to delight your guests.

Honey Balsamic Pork Fillets

By | Recipes | No Comments

This delicious Honey Balsamic Pork Tenderloin is ideal for an elegant dinner gathering, yet it’s speedy enough for a straightforward weeknight meal. It’s consistently a crowd-pleaser, offering a flawless blend of sweet, savoury, tangy, and spicy notes!

Prep Time: 15  Minutes  |  Cook Time: 25  Minutes  | Serves 8

Ingredients:

  • 2 pork tenderloins, each weighing approximately 450 grams and trimmed
  • 2 teaspoons of seasoned salt
  • 2 teaspoons of garlic powder
  • 240 ml of balsamic vinegar
  • 125 ml of honey
  • 60 ml of chicken or vegetable broth
  • 60 ml of ketchup
  • 60 ml of firmly packed brown sugar
  • 2 tablespoons of Worcestershire sauce
  • 2 tablespoons of cornstarch
  • 2 cloves of minced garlic
  • ¾ teaspoon of salt
  • ½ teaspoon of black pepper
  • ⅛ teaspoon of red pepper flakes

Method

  1. Preheat your oven to 200 degrees Celsius and lightly grease a baking dish measuring approximately 23×33 centimeters.
  2. Trim the pork tenderloins, then rub them with the seasoned salt and garlic powder. Place them in the prepared baking dish.
  3. In a medium-sized bowl, whisk together the balsamic vinegar, honey, broth, ketchup, brown sugar, Worcestershire sauce, cornstarch, minced garlic, salt, black pepper, and red pepper flakes.
  4. Pour this mixture over and around the pork tenderloins in the baking dish.
  5. Bake for 20-30 minutes, or until a meat thermometer registers an internal temperature of 63 degrees Celsius.
  6. Remove the baking dish from the oven and allow the pork to rest for 10 minutes before slicing it into pork medallions for serving.

Bacon-Wrapped Asparagus

By | Recipes | No Comments

Bacon-wrapped asparagus is a crowd-pleaser and a perfect combination of flavors and textures. Enjoy your delicious and savoury treat!

Preparation Time: 10 minutes Cooking Time: 15-20 minutes Total Time: 25-30 minutes Servings: 4

Ingredients:

      • 1 bunch of fresh asparagus spears (about 450g)
      • 8-10 slices of bacon (thinly sliced works best)
      • Olive oil for brushing
      • Salt and black pepper to taste
      • Toothpicks (optional)

Method

  1. Preheat the Oven: Preheat your oven to 400°F (200°C).
  2. Prepare the Asparagus: a. Wash the asparagus under cold water. b. Snap off the tough, woody ends of the asparagus, as mentioned in the previous recipe.
  3. Wrap the Asparagus: a. Take a slice of bacon and start at the bottom of an asparagus spear. b. Gently wrap the bacon around the asparagus in a spiral pattern until you reach the top. c. If the bacon doesn’t stick on its own, you can secure it with a toothpick, but it’s not always necessary.
  4. Arrange on a Baking Sheet: Place the bacon-wrapped asparagus on a baking sheet lined with parchment paper or a lightly greased baking dish. Leave a little space between each piece to allow for even cooking.
  5. Brush with Olive Oil: Brush the bacon-wrapped asparagus with a bit of olive oil. This helps the bacon crisp up nicely during baking.
  6. Season: Season the bacon-wrapped asparagus with a pinch of black pepper. Remember that the bacon itself is quite salty, so you may not need to add additional salt.
  7. Bake in the Oven: Place the baking sheet in the preheated oven and bake for about 20-25 minutes or until the bacon is crispy and the asparagus is tender. You can broil for an additional 1-2 minutes at the end if you want the bacon to be extra crispy.
  8. Serve: Remove the bacon-wrapped asparagus from the oven and let them cool slightly. If you use toothpicks, make sure to remove them before serving. Arrange on a platter and serve as an appetizer or side dish.

Mummy Hot Dogs

By | Recipes | No Comments

These mummy hot dogs are not only budget-friendly but also a hit with both kids and adults. They make for a fun and spooky addition to your Halloween celebration. Enjoy!

Prep Time: 5  Minutes  |  Cook Time: 5  Minutes  | Serves 4

Ingredients:

  • 1 can of refrigerated crescent roll dough
  • 8 hot dogs
  • Mustard or ketchup (for eyes)
  • Cooking spray

Method

  1. Preheat the oven: Preheat your oven according to the crescent roll dough package instructions.
  2. Prepare the hot dogs: If your hot dogs are longer than you’d like, you can cut them in half to make them bite-sized for the mummies.
  3. Unroll the dough: Open the can of crescent roll dough and carefully unroll it. You should have a sheet of dough with perforations.
  4. Cut the dough: Use a knife to cut the dough into thin strips. These strips will be used to wrap the hot dogs and create the mummy’s bandages.
  5. Wrap the hot dogs: Take one strip of dough and wrap it around a hot dog. Leave a small gap near the top to create a space for the mummy’s eyes. Continue wrapping until the hot dog is mostly covered. Leave a small gap at the bottom for the mummy’s “feet.”
  6. Bake: Place the wrapped hot dogs on a baking sheet that has been lightly greased with cooking spray. Bake in the preheated oven according to the crescent roll dough package instructions or until the dough is golden brown and the hot dogs are heated through.
  7. Create the eyes: Once the mummy hot dogs have cooled slightly, use mustard or ketchup to create eyes in the gap you left near the top of each hot dog. You can make them as spooky or silly as you like!
  8. Serve: Arrange your mummy hot dogs on a serving platter, and they’re ready to be devoured by your Halloween party guests

Greek Lemon Chicken

By | Recipes | No Comments

This Greek Lemon Chicken exudes juicy tenderness and an exceptional depth of flavour. Try marinating overnight or a minimum of 30 minutes to allow the infusion of flavours. This extended duration guarantees a flawlessly tender chicken, bursting with its exceptional flavours.

Prep Time: 10  Minutes  |  Cook Time: 10  Minutes  | Serves 4

Ingredients:

  • 4 boneless, skinless chicken breasts, pounded thin
  • 1/4 cup extra virgin olive oil
  • 5 chopped garlic cloves
  • Juice of 1/2 lemon (approximately 2 tablespoons)
  • 1 teaspoon paprika
  • 1 teaspoon salt
  • 1/2 teaspoon black pepper
  • 1 tablespoon Greek seasoning
  • 1/4 cup Greek yogurt

Method

  1. n a mixing bowl, blend together the olive oil, chopped garlic, lemon juice, paprika, salt, black pepper, Greek seasoning, and Greek yogurt to create a creamy and flavorful marinade.
  2. Place the chicken breasts in a resealable plastic bag or a shallow dish. Pour the yogurt-based marinade over the chicken, ensuring each piece is thoroughly coated. Seal the bag or cover the dish and chill in the refrigerator. Allow the chicken to marinate for at least 30 minutes or, for the ultimate infusion of flavors, overnight.
  3. Heat a pan and add a drizzle of olive oil to prevent sticking. Carefully place the marinated chicken breasts onto the hot pan. Sear the chicken on one side for about 4-5 minutes or until a golden-brown crust forms. Flip the chicken breasts and sear the other side for an additional 4-5 minutes.